Lionel-brand model trains have been a popular choice among model train enthusiasts for over 100 years. Whether you’ve owned vintage Lionel trains for years or have just gotten into the model train game, you’ve decided that it’s time to create a model train layout to display your Lionel trains. But, how do you get started?
There are several steps you need to take to build a Lionel train layout. The first steps involve choosing a track plan and building a platform for your layout. Then, you can pick a roadbed and lay your trackwork. After wiring your trains to the layout, you’re ready to add scenery and accessories.
Ultimately, there are a lot of personal preferences and creative liberties that will dictate how you build a layout for your Lionel model trains. However, the basic steps are the same for everyone. Keep reading to learn more about creating the perfect Lionel train layout!
How to Make a Lionel Train Layout
If you’re just starting out with model trains or looking to build your own layout for the first time, you’re probably wondering where exactly to begin. In general, there is no “correct” way to create a model train layout. Everybody enjoys model trains in a different way, so there are many creative liberties you’ll take along the way.
However, whether you’re building a simple layout or one with all the bells and whistles, you will need to follow the same basic steps. The different processes involved in building a model train layout include:
- Choosing your track plan
- Building your layout’s platform
- Choosing a road bed
- Laying the trackwork
- Adding scenery and accessories
Below, we will highlight the best practices for each of these five steps. Read on to learn how to craft a professional-looking Lionel train layout at home!
Choosing Your Track Plan
Planning is a big part of creating a functional Lionel train layout. The first step, and possibly one of the most important steps, is to choose your track plan.
What shape will your track be? How many loops do you want, and how big will each of them be? You will need to build your platform according to these specifications, so the first step of the process involves designing the layout of your model railroad tracks.
A lot of people like to draw out their own track plan. Others prefer to use some kind of track planning software (SCARM is a popular choice). Some even look for pre-designed track plans online, then use that as the basis for their layout. The possibilities are nearly endless — it just depends on your personal preferences and the amount of space you have available for your layout.
Building Your Layout’s Platform
You have chosen the track plan you will use as the base for your model train layout. Now, it’s time to take that plan and build a strong platform to display it on! The number one thing to keep in mind here is that your platform should fit your track plan well, with a bit of extra room to allow you to expand in the future.
It’s incredibly important to ensure your entire layout fits well on the platform. If there’s not enough space to hold everything, you may experience frequent derailments and other issues.
While there are lots of pre-built model train platforms available online, building everything on your own is often the better choice. This way, you can customize the size and shape based on your track plan, as well as the type of space you have available for your platform. If you do choose to purchase a pre-made option, be sure to double-check all the specifications to ensure it will perfectly fit both your track plan and the room you’ll set your layout up in.
Most people build their platforms at home using differently-sized pieces of plywood and a miter saw. To ensure your platform can hold your tracks, trains, and accessories, use a piece of plywood at least ½” thick as your tabletop. Cross-bracing underneath the weakest points in the middle and reinforcing the legs with features like table aprons will ensure your platform holds up as well as possible for as long as possible.
While it’s not completely necessary, most people prefer to paint their platform once they’ve finished building it. This creates a nicer look than the basic, light wood color traditionally offered by plywood. If you do choose to paint your platform, make sure to pick a neutral color that matches the vision you have for your model train layout in your head. Some popular options include green and dark brown.
Choosing a Road Bed
Some people skip this step entirely, laying their track directly on their platform. However, most model train enthusiasts choose to add a road bed. This will help you create a more realistic feel, as trains are set a little bit off the ground in real life. A road bed will also reduce any noise that may come from the trains running along the track.
If you’re new to the world of model trains, you may be wondering: what exactly is a road bed?” In general, a road bed (sometimes referred to as a track bed) is a “bed” that the train rails rest on. You have many choices in terms of materials. However, the following are some of the most popular choices:
- Homasote
- Homoabed
- Woodland Scenic cork
Road bed typically comes in large rolls. You can shape the material according to the kind of track design you have planned. However, different materials work best for different track designs and personal preferences.
For example, if your track plan includes a lot of curved rails, Homoabed will typically be the best choice. If you’re looking for the most readily available and popular choice, go with some kind of high-quality cork material.
Before you begin laying your road bed, make sure that the entire surface of the platform is completely clean, flat, and free of any debris. If you lay your road bed over any bumps, it could cause your trains to derail or get stuck along the tracks as they move along. Use your track plan to mark the train’s path on your platform, then use these marks as a guide to lay your road bed.
In the past, screws and nails were the most popular choice for securing a road bed to a model train platform. These days, however, most people prefer to use silicone caulk instead. This helps the road bed lay much more flat on the surface. Just be careful not to use too much caulk and create any hazardous bumps between the road bed and platform!
Laying Your Trackwork
You have your track plan in hand, you’ve finished building a secure platform, and you have prepared your rail bed. Now, it’s time for the real fun to begin! In this next step, you will begin to lay the tracks that your trains will run on.
If you did choose to add a road bed, you can follow the path you’ve already set to lay your railroad tracks. If you chose to skip the road bed step, now’s the time to mark your track plan on the platform so you have a clear idea of where to place everything.
Like road beds, nails and tacks were the most popular choice for securing railroad tracks to their platform for years. However, more and more people these days are choosing to use silicone caulk instead.
This method will ensure that there are no bumps along your tracks, which could cause trains to derail or stop moving in their tracks. Plus, while silicone caulk is strong enough to secure your tracks, it is also easy to remove. If you ever get tired of your current layout, you can easily move things around without leaving any holes behind.
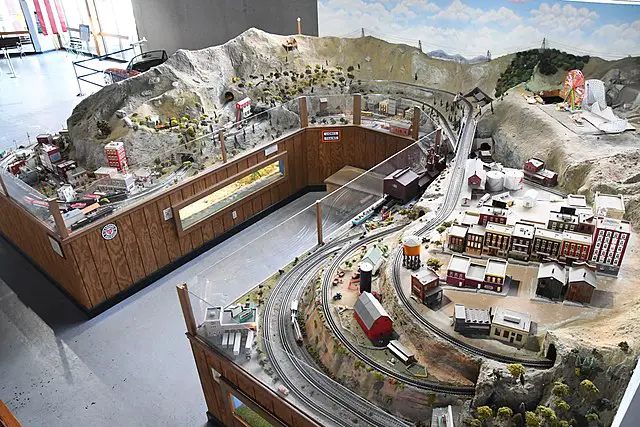
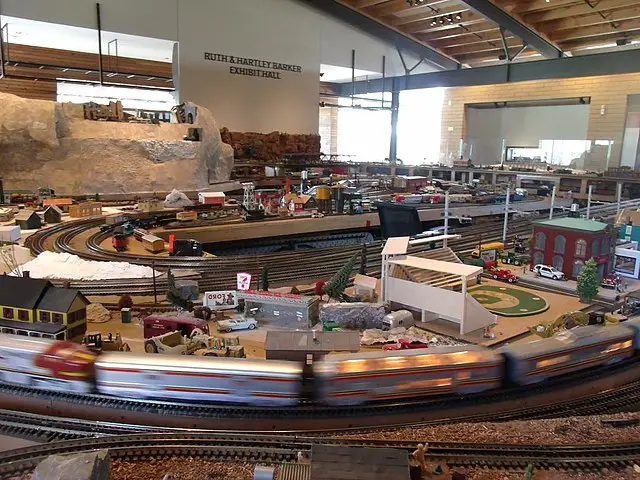
Adding Scenery and Accessories
Once you have finished laying your trackwork, you can start adding all the scenery and accessories you want. The possibilities here are nearly endless.
Some people keep it basic with some grass, a few buildings, and a couple of light posts, while others like to go all out. Choose the “theme” you want for your layout, then gather all the accessories you need to achieve the look you’re going for.
There are lots of different types of scenery and accessories you can add to your layout. Some of the things you might want to consider include:
- Cliffs
- Trees
- Fields
- Roads
- Animals
- Mountains
- Rivers or lakes
- Telephone poles
You can purchase your accessories pre-built, or get creative and make a few of your own.
Things to Consider While Wiring Your Lionel Train Layout
If you’ve never wired anything before, the thought of wiring your Lionel train layout might seem daunting. However, as long as you follow all the correct steps, you should not have any issues.
One of the first things you’ll need to think about is how much electricity you will need to power your layout. This depends on:
- The size of your layout
- How many trains you’ll run
- The number of wired accessories you connect
Most people wire their trains and tracks separately from their accessories. While you can connect everything to the same power source, conventionally-controlled trains require a variable voltage to change speed. Accessories, on the other hand, look and function better on a fixed voltage. Separating your power sources will allow everything to operate much more efficiently, because no power from the trains will need to be diverted to accessories.
If you’re using conventional control to power your trains, make sure your power supply allows for a variable voltage of up to 18 volts. If you’re using command control, a fixed power supply of 18 volts will be necessary. To power your accessories, you will generally need a fixed power supply of 14 volts.
The number of switches, blocks, and transformers you need depends on the number of trains and accessories you want to run. When setting up your wiring, it’s best to check everything as you go. Take it one step at a time, as it’s much easier to correct any mistakes when you don’t have to shift through tons of wiring to do so.
Another important thing to consider is polarity. The majority of your wiring will be through your tracks, as it runs throughout the entire layout and carries the electrical current that powers your train and all your accessories. The positive current should always be on the right side of the track, and the negative current should be on the left. Make sure to maintain this polarity throughout, or else your track may short circuit.
For any connections you may want to remove or change at any point, you can use crimp-on connectors and terminal strips. Solder all your permanent connections and protect them with electrical tape.
Don’t be intimidated by the wiring process. Any mistakes you make will be easy to find and correct. Just take it one step at a time and don’t do anything you aren’t comfortable with.
Why Choose Lionel Trains for Your Model Train Layout?
Lionel is possibly the most well-known name in the model railroad game. They’ve been manufacturing model trains and accessories since 1900, specializing in O gauge products. Their expansive range of products includes:
- Buildings
- Cabooses
- Freight cars
- Passenger cars
While Lionel products can be more expensive than other brands, you get what you pay for. The company has been around for over 100 years, and their products’ originality and level of quality have never faltered. They even have ready-to-run train sets, which include everything you need to get started on your model train layout.
The Bottom Line
Whether you’re looking to build the simplest or most elaborate Lionel model train layout possible, you will need to follow the same basic steps. The first thing you should do is choose a track plan, then you can start building your platform. After that, you’ll lay your road bed and tracks. Finally, you can begin adding accessories and wiring electricity to everything.